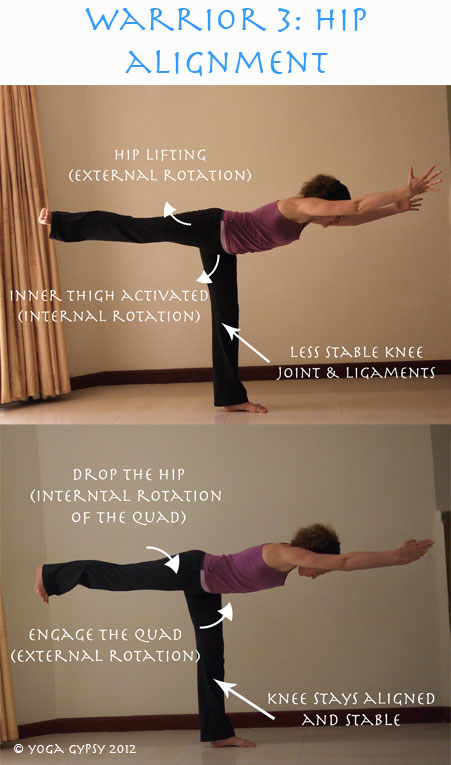
A reader left the following comment on a post about Warrior III: "I still have a hard time maintaining this pose. Are there any easier poses that will give me the strength to execute warrior pose 3?"
Warrior III is a challenging standing balance - a real power pose, but also one that requires heart. Any pose that requires heart also requires us to be compassionate with ourselves - so keep that in mind as you work towards this challenge. :)
There is a lot going on in Warrior III, but for the purposes of this post, there are two main aspects that we are going to work on to build more stability and ease in this challenge pose. Each aspect is an opposing pair, or muscle groups that work together:
- Strong quadriceps and long hamstrings
- Strong core and lower back
NOTE: Warrior III is a strong pose. The exercises below are not recommended if you have any injuries or have recently had surgery, especially but not limited to back injuries, hip or knee replacements, or a caesarian section.
1. Leg lifts
Stretches the hamstrings and warms up the abdominal muscles.
Lie on your mat with your arms stretched out overhead and your feet flexed. As you exhale, use your abdominal muscles to draw the lower ribs down towards the floor and tuck the belly button towards the spine.
On an exhale, slowly raise one leg in the air. On an inhale, slowly lower the leg. Try to use the core muscles to initiate and sustain the movement - not the muscles of the leg.
Do each side 4-10 times.
Think about it: If you are able to raise the leg to about 90 degrees, then you are exactly imitating the alignment of Warrior III, only lying down!! If you can't get the leg to 90 degrees while keeping it straight, then you will need to work on your hamstring flexibility to achieve the full pose.
Make it easier: If you feel any stress in your lower back, try bending the non-active leg and placing the foot on the floor, or bring your arms down by your sides, or both.
Make it harder: Raise and lower the leg in 4-6 increments, exhaling to move the leg and inhaling as you hold.

2. Balancing cat
Warms up the abdominals and the lower back muscles.
Come to all fours with your hands underneath your shoulders and your knees underneath your hips.
Firm through the core and then lift one leg, stretching it straight out behind you. Keep the leg at the same height of your torso (many of us tend to lift it too high!) and strongly lengthen through the thigh and the heel as if you were pressing your foot against a wall. Or, even better - press your foot against a wall!!
If your balance fees comfortable and stable here, lift the opposite arm and stretch it out in front of you. Keep the arm about the height of your ear - you are trying to create a straight line from the heel, to the hip, to the shoulder, to the ear, to the fingertips. Keep your neck soft and long. Keep your abdominals engaged.
Hold for 3-5 breaths, repeat 1-3 times on each side.
Think about it: This is basically the shape of Warrior III only with one knee bent and one arm down. Feel how you can use your core to support yourself as you lengthen through the fingertips and through the heel of the outstretched foot. Practice inner rotation on the raised thigh, dropping the hip down and extending through the heel.
Make it easier: Don't raise the opposite arm.
Make it harder: Do a series of crunches before holding the pose: as you exhale, round the spine, lift through the core, and draw your raised knee towards your nose. As you inhale, straighten the leg.

3. Intense side stretch variation
Stretches the hamstrings and strengthens the lower back, one side at a time.
Come to standing with your feet hip width apart. Step one foot back so your feet are about a leg's length apart. Turn your back foot so the toes are pointing forwards or at a 45 degree angle.
Place the arm corresponding to your front leg on your lower back. Raise the opposite arm and as you exhale, keep the arm extended as you come all the way down into intense side-stretch. Inhale here.
Exhale, lift your extended arm halfway, bringing your torso parallel to the ground. Inhale, hold. Exhale, come back down.
Repeat 4-6 times on each side.
Make it easier: If you have tight hamstrings, you don't need to come all the way down in this pose. Just come as far as is comfortable, and then lift back up. Even if you are only lifting an inch or two, you will still be getting the benefits of this pose!
Make it harder: On your last repetition, hold the lifted position for 3-5 breaths.

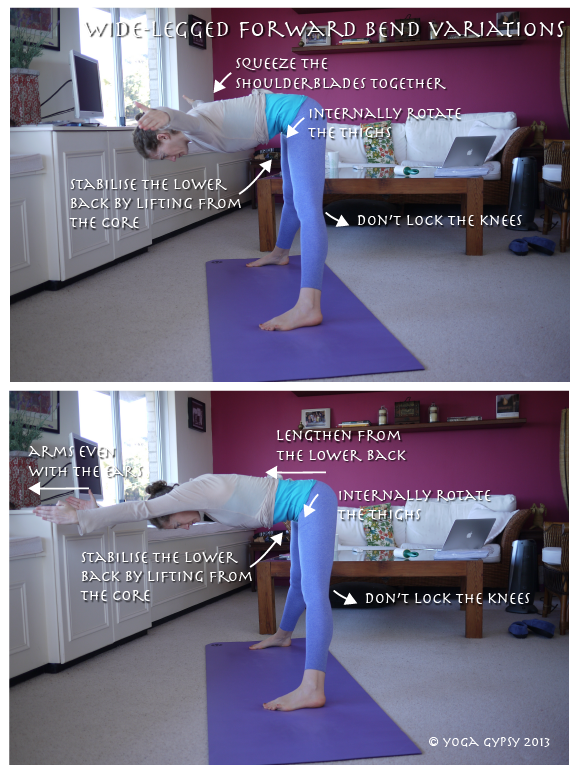
4. Wide-legged forward bend variation
Strengthens the abdominal muscles and the lower back muscles, both sides together.
Stand sideways on your mat with your arms stretched out to your sides. Your feet should be wide apart, but no wider than underneath your wrists - if you bring the feet too wide you will lose stability in this pose.
Exhale, and draw the belly muscles in towards the spine as you bend forward from the waist, keeping the arms outstretched. Keep your thighs internally rotate and don't lock the knees, but keep your thighs strongly engaged in this pose.
If this feels ok, try the following:
Exhale, extend the arms out in front of you, arms even with the ears.
Hold each variation 3-5 breaths, being observant that you are not feeling any strain in your lower back.
Make it easier: Keep your hands on your hips or bring them into prayer position.
5. Warrior III variations
Try these variations on the full pose.
With all those warm ups, try the following variations on the full pose! You can practice these at home or bust them out in class.
a) Warrior III with your hands on a chair - helps you to get a sense of the shape of the full pose and get a great lengthening stretch, without having to worry too much about losing your balance! You can also do this with your back heel pressed against a wall to get a real sense of how to engage your back leg.
b) Warrior III with your hands in prayer - brings the centre of gravity back and takes the stress off the lower back. This variation is especially recommended if you feel strain in your back when you attempt the full pose.
c) Warrior III with your arms outstretched in "airplane" - brings the centre of gravity back and lets you use your arms a bit to help with balance. This version is great if you keep toppling over in the pose!

---------------------------------------------------------