Yes, dear readers, I've finally caught up with the times and created a Facebook page.
I love hearing all your questions, thoughts, comments and insights in the blog as well as in real life, and I wanted to create a kind of community to bring all of it together. So if you are socially-media minded, please connect with me:
https://www.facebook.com/YogaGypsyBlog
I hope to chat with you there!!
Sunday, June 23, 2013
Friday, June 21, 2013
Guest post: 7 Elements of a Great Teacher Training Program
Dear readers, have you ever considered doing a yoga teacher training? Today's post is a guest post by Elizabeth Emberly, who owns Naada Yoga, a Montreal-based studio that is taking a whole new approach to yoga teacher training. Whatever kind of YTT you are considering, the post below offers some true pearls of wisdom! Read and enjoy, and as always, leave your feedback! What did you / would you look for in a YTT?
-------------------------------------------------
As more
people begin to reap the physical, mental and spiritual benefits of yoga practice,
the importance of effective teacher training programs increases exponentially.
I applaud
anyone who, for any reason, wants to embark on a Yoga Teacher Training (YTT)
Program. However, because the stakes are high and YTTs cost money, prospective
students have to be sure they research to find the program that fits best with
them.
Here, to
help prospective students, are 7 elements of a great YTT:
1) A program that cares about you
Students enter
Yoga Teacher Training programs for many reasons. Whatever your goal(s), the
program should endeavor to help you get there. Whether that means empowering
you to focus on the benefits of yoga for specific populations, expand your
spiritual horizons, or begin a career as a teacher, the best schools have
mechanisms in place to help students after graduation.
2) Flexibility
A good program accounts
for life outside the studio. It should include flexible hours, and classes should
be available both part-time and on the weekends. Similar to a professional
program in a university, you should be able to complete your YTT at your own
pace.
3) The ability to further your learning
A 200-hour
program is normally the first stepping-stone to becoming a Yoga instructor. As
your training progresses, there needs to be opportunities for advancement,
ideally under the same roof. Ask if a
school allows you to further your study via 300-hour or 500-hour programs. Once
you acquire the base learnings you may want to take things to another level.
4) Financial value and support
Every student
should be comfortable with his/her tuition fees. Flexible payments should be
available. At my studio, Naada Yoga, we offer a work exchange program, which reduces
tuition costs for the 500hr teacher-training program students by approximately $1000.
Whenever possible, try to look for studios that offer similar initiatives and/or
grants to help students along the way.
5) Internationally recognized certification
What good is a
certification if it’s not from an accredited training school? Make sure the
program you enroll in is up to par with any new regulations or alliances that
will help you put your best foot forward as a graduate.
6) A real sense of community
Getting through any
type of schooling is easier when you are entrenched in a community of learning
with like minded peers. It empowers study and fosters personal growth. When
choosing a Yoga Teacher Training Program, look for ways the institution
welcomes and integrates students, as well as what it does to foster a sense of
community. We’ve tried hard to do this at Naada – even taking pains to consider
this factor when we designed the studio layout – and it pays off for students.
7) Well-rounded and qualified teachers
You must make sure the
teachers involved in your program are of the highest quality. There is no
substitute to learning from the best. Variety also matters, because yoga is a
rich and diverse discipline. The best teacher training programs have high
quality faculties with divergent expertise and multiple perspectives. This
allows students to experience and learn different approaches.
Elizabeth
Emberly is the proud owner of Montreal’s Naada Yoga. Naada Yoga offers an
extensive Yoga Teacher Training Program that mirrors the approach of a
university. The school brings together leading thinkers such as Rodney Yee,
Michael Stone, Richard Rosen and others, and features 200, 300, 500 and 1000
hour certifications. For more info visit www.naada.ca/teacher-training
Tuesday, June 18, 2013
Yoga Tip Tuesdays: Preparatory poses for Warrior 3
Hello everyone!
A reader left the following comment on a post about Warrior III: "I still have a hard time maintaining this pose. Are there any easier poses that will give me the strength to execute warrior pose 3?"
Warrior III is a challenging standing balance - a real power pose, but also one that requires heart. Any pose that requires heart also requires us to be compassionate with ourselves - so keep that in mind as you work towards this challenge. :)
There is a lot going on in Warrior III, but for the purposes of this post, there are two main aspects that we are going to work on to build more stability and ease in this challenge pose. Each aspect is an opposing pair, or muscle groups that work together:
NOTE: Warrior III is a strong pose. The exercises below are not recommended if you have any injuries or have recently had surgery, especially but not limited to back injuries, hip or knee replacements, or a caesarian section.
1. Leg lifts
Stretches the hamstrings and warms up the abdominal muscles.
Lie on your mat with your arms stretched out overhead and your feet flexed. As you exhale, use your abdominal muscles to draw the lower ribs down towards the floor and tuck the belly button towards the spine.
On an exhale, slowly raise one leg in the air. On an inhale, slowly lower the leg. Try to use the core muscles to initiate and sustain the movement - not the muscles of the leg.
Do each side 4-10 times.
Think about it: If you are able to raise the leg to about 90 degrees, then you are exactly imitating the alignment of Warrior III, only lying down!! If you can't get the leg to 90 degrees while keeping it straight, then you will need to work on your hamstring flexibility to achieve the full pose.
Make it easier: If you feel any stress in your lower back, try bending the non-active leg and placing the foot on the floor, or bring your arms down by your sides, or both.
Make it harder: Raise and lower the leg in 4-6 increments, exhaling to move the leg and inhaling as you hold.

2. Balancing cat
Warms up the abdominals and the lower back muscles.
Come to all fours with your hands underneath your shoulders and your knees underneath your hips.
Firm through the core and then lift one leg, stretching it straight out behind you. Keep the leg at the same height of your torso (many of us tend to lift it too high!) and strongly lengthen through the thigh and the heel as if you were pressing your foot against a wall. Or, even better - press your foot against a wall!!
If your balance fees comfortable and stable here, lift the opposite arm and stretch it out in front of you. Keep the arm about the height of your ear - you are trying to create a straight line from the heel, to the hip, to the shoulder, to the ear, to the fingertips. Keep your neck soft and long. Keep your abdominals engaged.
Hold for 3-5 breaths, repeat 1-3 times on each side.
Think about it: This is basically the shape of Warrior III only with one knee bent and one arm down. Feel how you can use your core to support yourself as you lengthen through the fingertips and through the heel of the outstretched foot. Practice inner rotation on the raised thigh, dropping the hip down and extending through the heel.
Make it easier: Don't raise the opposite arm.
Make it harder: Do a series of crunches before holding the pose: as you exhale, round the spine, lift through the core, and draw your raised knee towards your nose. As you inhale, straighten the leg.

3. Intense side stretch variation
Stretches the hamstrings and strengthens the lower back, one side at a time.
Come to standing with your feet hip width apart. Step one foot back so your feet are about a leg's length apart. Turn your back foot so the toes are pointing forwards or at a 45 degree angle.
Place the arm corresponding to your front leg on your lower back. Raise the opposite arm and as you exhale, keep the arm extended as you come all the way down into intense side-stretch. Inhale here.
Exhale, lift your extended arm halfway, bringing your torso parallel to the ground. Inhale, hold. Exhale, come back down.
Repeat 4-6 times on each side.
Make it easier: If you have tight hamstrings, you don't need to come all the way down in this pose. Just come as far as is comfortable, and then lift back up. Even if you are only lifting an inch or two, you will still be getting the benefits of this pose!
Make it harder: On your last repetition, hold the lifted position for 3-5 breaths.

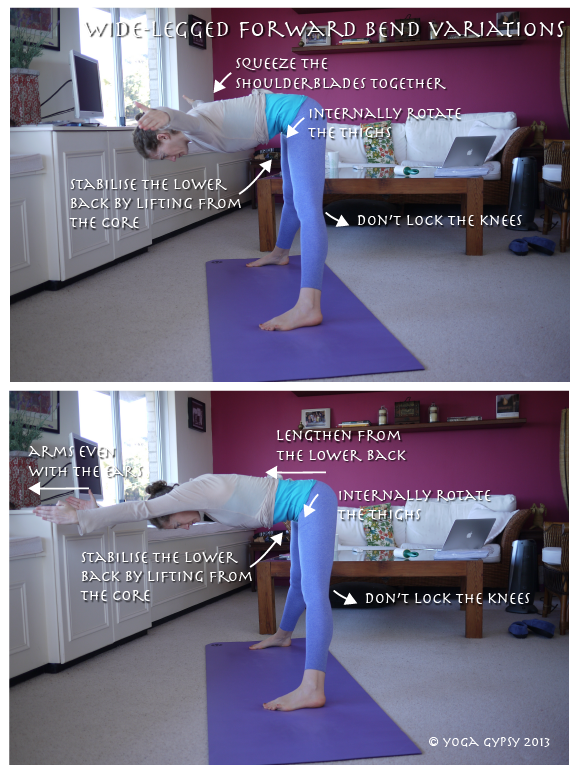
4. Wide-legged forward bend variation
Strengthens the abdominal muscles and the lower back muscles, both sides together.
Stand sideways on your mat with your arms stretched out to your sides. Your feet should be wide apart, but no wider than underneath your wrists - if you bring the feet too wide you will lose stability in this pose.
Exhale, and draw the belly muscles in towards the spine as you bend forward from the waist, keeping the arms outstretched. Keep your thighs internally rotate and don't lock the knees, but keep your thighs strongly engaged in this pose.
If this feels ok, try the following:
Exhale, extend the arms out in front of you, arms even with the ears.
Hold each variation 3-5 breaths, being observant that you are not feeling any strain in your lower back.
Make it easier: Keep your hands on your hips or bring them into prayer position.
5. Warrior III variations
Try these variations on the full pose.
With all those warm ups, try the following variations on the full pose! You can practice these at home or bust them out in class.
a) Warrior III with your hands on a chair - helps you to get a sense of the shape of the full pose and get a great lengthening stretch, without having to worry too much about losing your balance! You can also do this with your back heel pressed against a wall to get a real sense of how to engage your back leg.
b) Warrior III with your hands in prayer - brings the centre of gravity back and takes the stress off the lower back. This variation is especially recommended if you feel strain in your back when you attempt the full pose.
c) Warrior III with your arms outstretched in "airplane" - brings the centre of gravity back and lets you use your arms a bit to help with balance. This version is great if you keep toppling over in the pose!

As always, I love your comments so please leave your feedback! Was this tip
helpful?What else would you like tips about?
A reader left the following comment on a post about Warrior III: "I still have a hard time maintaining this pose. Are there any easier poses that will give me the strength to execute warrior pose 3?"
Warrior III is a challenging standing balance - a real power pose, but also one that requires heart. Any pose that requires heart also requires us to be compassionate with ourselves - so keep that in mind as you work towards this challenge. :)
There is a lot going on in Warrior III, but for the purposes of this post, there are two main aspects that we are going to work on to build more stability and ease in this challenge pose. Each aspect is an opposing pair, or muscle groups that work together:
- Strong quadriceps and long hamstrings
- Strong core and lower back
NOTE: Warrior III is a strong pose. The exercises below are not recommended if you have any injuries or have recently had surgery, especially but not limited to back injuries, hip or knee replacements, or a caesarian section.
1. Leg lifts
Stretches the hamstrings and warms up the abdominal muscles.
Lie on your mat with your arms stretched out overhead and your feet flexed. As you exhale, use your abdominal muscles to draw the lower ribs down towards the floor and tuck the belly button towards the spine.
On an exhale, slowly raise one leg in the air. On an inhale, slowly lower the leg. Try to use the core muscles to initiate and sustain the movement - not the muscles of the leg.
Do each side 4-10 times.
Think about it: If you are able to raise the leg to about 90 degrees, then you are exactly imitating the alignment of Warrior III, only lying down!! If you can't get the leg to 90 degrees while keeping it straight, then you will need to work on your hamstring flexibility to achieve the full pose.
Make it easier: If you feel any stress in your lower back, try bending the non-active leg and placing the foot on the floor, or bring your arms down by your sides, or both.
Make it harder: Raise and lower the leg in 4-6 increments, exhaling to move the leg and inhaling as you hold.
2. Balancing cat
Warms up the abdominals and the lower back muscles.
Come to all fours with your hands underneath your shoulders and your knees underneath your hips.
Firm through the core and then lift one leg, stretching it straight out behind you. Keep the leg at the same height of your torso (many of us tend to lift it too high!) and strongly lengthen through the thigh and the heel as if you were pressing your foot against a wall. Or, even better - press your foot against a wall!!
If your balance fees comfortable and stable here, lift the opposite arm and stretch it out in front of you. Keep the arm about the height of your ear - you are trying to create a straight line from the heel, to the hip, to the shoulder, to the ear, to the fingertips. Keep your neck soft and long. Keep your abdominals engaged.
Hold for 3-5 breaths, repeat 1-3 times on each side.
Think about it: This is basically the shape of Warrior III only with one knee bent and one arm down. Feel how you can use your core to support yourself as you lengthen through the fingertips and through the heel of the outstretched foot. Practice inner rotation on the raised thigh, dropping the hip down and extending through the heel.
Make it easier: Don't raise the opposite arm.
Make it harder: Do a series of crunches before holding the pose: as you exhale, round the spine, lift through the core, and draw your raised knee towards your nose. As you inhale, straighten the leg.
3. Intense side stretch variation
Stretches the hamstrings and strengthens the lower back, one side at a time.
Come to standing with your feet hip width apart. Step one foot back so your feet are about a leg's length apart. Turn your back foot so the toes are pointing forwards or at a 45 degree angle.
Place the arm corresponding to your front leg on your lower back. Raise the opposite arm and as you exhale, keep the arm extended as you come all the way down into intense side-stretch. Inhale here.
Exhale, lift your extended arm halfway, bringing your torso parallel to the ground. Inhale, hold. Exhale, come back down.
Repeat 4-6 times on each side.
Make it easier: If you have tight hamstrings, you don't need to come all the way down in this pose. Just come as far as is comfortable, and then lift back up. Even if you are only lifting an inch or two, you will still be getting the benefits of this pose!
Make it harder: On your last repetition, hold the lifted position for 3-5 breaths.
4. Wide-legged forward bend variation
Strengthens the abdominal muscles and the lower back muscles, both sides together.
Stand sideways on your mat with your arms stretched out to your sides. Your feet should be wide apart, but no wider than underneath your wrists - if you bring the feet too wide you will lose stability in this pose.
Exhale, and draw the belly muscles in towards the spine as you bend forward from the waist, keeping the arms outstretched. Keep your thighs internally rotate and don't lock the knees, but keep your thighs strongly engaged in this pose.
If this feels ok, try the following:
Exhale, extend the arms out in front of you, arms even with the ears.
Hold each variation 3-5 breaths, being observant that you are not feeling any strain in your lower back.
Make it easier: Keep your hands on your hips or bring them into prayer position.
5. Warrior III variations
Try these variations on the full pose.
With all those warm ups, try the following variations on the full pose! You can practice these at home or bust them out in class.
a) Warrior III with your hands on a chair - helps you to get a sense of the shape of the full pose and get a great lengthening stretch, without having to worry too much about losing your balance! You can also do this with your back heel pressed against a wall to get a real sense of how to engage your back leg.
b) Warrior III with your hands in prayer - brings the centre of gravity back and takes the stress off the lower back. This variation is especially recommended if you feel strain in your back when you attempt the full pose.
c) Warrior III with your arms outstretched in "airplane" - brings the centre of gravity back and lets you use your arms a bit to help with balance. This version is great if you keep toppling over in the pose!
---------------------------------------------------------
Monday, June 10, 2013
Therapeutic stretches for low back pain
This was originally posted as a guest post on the fabulous Nadine Fawell's blog! If you're not a regular over there, take some time to check it out - it is truly TOP quality, folks.


Please note that this sequence is designed to relieve everyday aches and pains associated with the lower back muscles, for example from sitting down too long, posture, carrying children around etc. It is NOT intended for people with back injuries, SI joint dysfunction, disc compression, or recently herniated discs and some of the movements may make those conditions worse.
These movements are based on the therapeutic teachings of Gary Kraftsow.
These movements are based on the therapeutic teachings of Gary Kraftsow.
1. Opposite arm & leg stretch: stretches the lower back one side at a time
Begin lying on your back. Warm up by hugging your knees to your chest and breathing deeply in and out through the nose.
Exhale, release your hands to the floor. Inhale, raise your left leg towards the ceiling while stretching the right arm all the way behind you. Exhale, come back to the starting position. Inhale, raise your right leg and stretch your left arm. Repeat 4-6x on each side.
Tips: It doesn’t matter if your leg isn’t straight or your arm doesn’t touch the floor behind you. Just find a stretch that feels good and move in synch with your breath.
2. Cat & Cow: releases the lower back & the pelvis
Come onto all fours. As you exhale, tuck your tailbone under and round the lower back up towards the ceiling. Start the movement at the pelvis and let it travel all the way up your spine to your neck. Then as you inhale, drop your lower back down towards the floor and arch the spine in the other direction. Focus on moving in synch with your breath and on staying within a range of movement that feels good to you and is not too extreme.
Tip: Place some padding under the knees and under the hands to reduce stress on your joints.
3. Hero/Child: strengthens the lower back & releases the hips
After cat/cow, leave your hands where they are and stretch your hips/buttocks back towards your heels. This is child’s pose. Exhale here, then inhale rise up onto your knees and reach both arms up, keeping the arms even with your ears as you come up. Exhale, come back down, still with straight arms.
Tip: Place some padding under the knees. You can also place a rolled up towel over your heels to pad your hips as you come down.
Make it easier: Do only one arm at a time, resting the other arm on the lower back.
4. Gate pose: stretches the muscles either side of the lower back
Still on your knees, step the right foot out to the side. Turn the right foot forward. Take a gentle sideways bend by inching your right hand down your right leg. Find a stretch you can comfortably hold. Then, inhale and reach your left hand up and back. Exhale, look towards your right foot and stretch your left arm over your ear. Repeat 3x, and on the 3rd time hold the second position for about 30seconds. Then do the other side.
When you are done, take child’s pose.
Tip: Place some padding under the knee that is on the ground. Use the right hand as a stabiliser only and try not to put too much weight on it. Don’t put the right hand directly on the knee – keep it either just above or just below.
5: Cobra/half cobra: strengthens the lower back muscles with support from the arms
Don’t do any of these poses if you feel a pinching sensation in your lower back!
Variation 1: Come to lie on your belly with your feet slightly apart. Place your palms underneath your shoulders, keeping your elbows close by your sides. Exhale fully, and as you inhale, lift your upper chest off the floor. Press your palms into the floor but – this is very important! – don’t push with your hands. They are only there for support. Exhale, come back down. Repeat 3x.
Variation 2: If Variation 1 felt totally OK, try adding a movement with the legs. As you inhale your chest up, bend the one knee and lift the foot towards your body. Exhale to come down. Repeat 3x with each foot.
Variation 3: If Variations 1 and 2 felt totally OK, try bending both knees as you lift up. Repeat 3x.
When you are done, take child’s pose.
Tips: Keep your belly and lower ribs on the floor – only the upper chest comes up. Press the tops of your feet into the floor to ground your legs as you lift up the chest. Keep your elbows by your sides and squeeze your shoulder blades together on your back. Keep your neck long.
Make it easier: If you feel pinching or compression in your lower back, spread the feet wider apart. Also, you don’t have to come up very high – just a few centimetres is plenty!
6: Half parsvottanasana: strengthens and releases the lower back, one side at a time
Come to standing (if you like, by coming through downward facing dog). Stand with your feet hip width apart or a bit wider. Then step your right foot forward and your left foot back, so you feet end up about a leg’s length apart. Place your right hand on your lower back, palm facing away from you. As you inhale, raise your left arm in the air. Exhale and bring your left hand towards your right foot, keeping the arm long as you come down. Inhale, come halfway up. Exhale, come all the way down. Inhale, come all the way back up. That is one round.
Do 3 rounds on each side. Remember that the raised arm is the opposite of the forward foot.
Tips: You want your hips to be squared towards the front. The wider apart your feet are (sideways, not front-to-back) the easier this will be. Try to turn the back toes as far forward as you can to get your hips even more square. Try to make sure the arm stays even with your ear as you are coming up and down.
Make it easier: Don’t try to come all the way to the floor. Place a yoga block or some books next to your front foot and bring your hand down onto those. Or, place a chair in front of you and bring your hand down onto the chair. When you inhale halfway back up, just make it half the distance you came down.
7: Pigeon: releases the psoas muscles
From standing, come back down to the floor. Bend the right knee and place it near the front of your mat, then slowly stretch your left leg out behind you. The right toes should be underneath or just to the side of your groin. Place your hands either side of the right knee.
As you inhale, lengthen your spine by pressing your hands (or fingertips) firmly into the ground and stretching up through the crown of your head. As you exhale, extend forwards over the bent knee. You don't need to come too far down! Inhale, use your hands to lift you up again. Repeat 4 times and on the 4th time, stay in a prone position for about 30 seconds to a minute. Then come up and do the other side.
Tips: If you find pigeon too tough on your knees or hips, check out these 4 ways to modify pigeon pose by Anna Guest-Jelley at Curvy Yoga! These are great modifications for people of ANY shape. :) If you are OK with the basic pose but your right hip is really hanging in the air, fold up a large towel or get a firm pillow (or two, or three…), and place it underneath your right buttock. You can also put some padding in between the right heel and your body, under the right knee and under the left knee or foot.
Make it easier: There's no need to push yourself in this stretch, so only come as far down as is comfortable. You will get the same benefit by just coming some of the way down and then coming up again! You can also place a yoga block, a stack of books or a pillow beside the right knee and bring your head down onto those.
When you have done both sides, take child’s pose.
Tips: If you find pigeon too tough on your knees or hips, check out these 4 ways to modify pigeon pose by Anna Guest-Jelley at Curvy Yoga! These are great modifications for people of ANY shape. :) If you are OK with the basic pose but your right hip is really hanging in the air, fold up a large towel or get a firm pillow (or two, or three…), and place it underneath your right buttock. You can also put some padding in between the right heel and your body, under the right knee and under the left knee or foot.
Make it easier: There's no need to push yourself in this stretch, so only come as far down as is comfortable. You will get the same benefit by just coming some of the way down and then coming up again! You can also place a yoga block, a stack of books or a pillow beside the right knee and bring your head down onto those.
8: Locust: strengthens and lengthens the lower back muscles, one side at a time
Come to lie on your belly with your right arm out in front of you, palm facing upwards. Press your left palm firmly into the floor. As you inhale, lift up the right arm and the left leg. As you exhale, come down. Repeat 3 times on each side, optionally holding the 3rd lift for about 30 seconds.
When you’re done, take child’s pose.
Tip: This pose is not about height as much as about length. Really reach through the lifted fingertips and stretch through the ball of the lifted foot. Keep your neck long instead of trying to crane upwards.
Make it easier: Don’t hold the lifted position, simply come up and down with the breath. Don’t try to come high off the floor – a few centimetres is perfectly fine to get the benefit of this pose! Working against gravity is hard – be gentle on yourself!
9: Janu sirsasana: stretches the lower back, one side at a time
Sit on the floor with your left leg out straight and your right foot resting against the inside of the left thigh. As you inhale, lengthen the spine (optionally stretching your arms above the head). As you exhale, fold forwards. Repeat 4 times, on the 4th time staying in the forward fold for 30 seconds. Come up slowly and do the other side.
Tips: If the right knee doesn’t come all the way to the floor, place a folded up towel or a firm pillow underneath it. You can also pad under the back of the left knee or under the left heel.
Make it easier: If your hamstrings are tight, bend the left knee or even place a rolled up towel under the back of the knee. If your hips complain, sit up on a firm pillow, a bolster, or even a chair. The higher up your hips are, the easier it will be to fold forwards in a safe and comfortable way.
10: Paschimottanasana: stretches the lower back symmetrically
This time, sit with both your legs stretching out in front of you. As you inhale, reach the arms up above the head. As you exhale, fold forward, keeping the spine as long as you can, and finally place your palms flat on the floor. Close your eyes and breathe here for 30 seconds to 1 minute. DO NOT try to pull yourself deeper into the stretch with your hands. DO NOT rock back and forth. Just fold forward, stay there, and breathe.
Tip: Place a few pillows on top of your legs and a rolled up towel under your knees so that when you fold forward, you can rest your chest on the pillows. This makes it a deliciously relaxing pose and a wonderful supported stretch for the lower back.
Make it easier: I highly recommend sitting up on a folded towel or a pillow when you do this stretch. If you can't get comfortable in the forward fold, try placing a chair over your legs with the chair seat facing towards you, and resting your head on the chair. Alternatively, you can actually do this forward fold while sitting on a chair (with your feet hip width apart and planted firmly on the floor).
11. Bridge pose: strengthens & stretches the lower back, stretches the psoas
Come to lie on your back with your knees bent and your feet planted on the floor. The feet should be parallel to each other and about one foot’s distance from your hips (as a rough guideline, you should almost be able to reach your heels with your fingertips if your arms are stretched out straight beside your body). Walk the shouderblades together and press the back of the head into the floor, looking straight up.
As you exhale, flatten the lower back into the floor. This automatically tucks your pelvis and lengthens the back muscles. As you inhale, press your feet into the floor, keep the alignment of the pelvis (think of lifting the pubic bone towards the ceiling) and gently lift up the hips while also stretching the right arm over the head. Try not to squeeze or clench your buttocks. As you exhale, come down. Alternate right and left arms, doing each side 3 times.
When you’re done, hug your knees to your chest for at least 30 seconds.
Tip: If you have a yoga block or something equivalent (firm and stable but not too hard), you can place it under your lower back for supported bridge. This can be a wonderful release for the lower back. When you are there, relax the buttocks completely, and stay in this pose for 1 minute, slowly building to about 3 minutes. (See picture below)
Make it easier: Don’t come up very high. Place a strap or belt around your thighs to hold the thighs in alignment, relieving pressure on the lower back.
12. Easy twist: releases the lower back, one side at a time
Begin with your knees raised towards the chest. Release your arms towards the floor, stretching out to the sides. On an exhalation, release both legs towards the right-hand side. If your neck is comfortable, look away from your knees. If that’s not comfortable, look straight up. Breathe deeply. Stay 30 seconds, then come up slowly and do the other side.
Tip: To keep your back nice and long, shift your hips a bit to the left before releasing your knees to the right, and vice versa.
Make it easier: Place a folded up towel or firm pillow (or several) underneath your knees so they don’t have to come down as far.
When you’ve done the whole sequence, take savasana, final resting pose, with some support underneath the knees. A rolled up towel or a bolster will do. You can also put your lower legs on a chair. Get as comfy as you can – use an eye pillow, put on some relaxing music – and stay in savasana for at least 3 minutes. When you are ready to come out, roll first onto your side, and then gently push yourself back up to sitting.
Friday, June 7, 2013
Tips for the traveling yogini (re-post)
[Originally posted on December 2nd 2009... slightly updated since then to reflect bits and pieces that I've learned along the way! By the way, this mainly applies to long-distance travel where you can't simply throw everything into your car, and every added pound of luggage matters!]
While you're there
What kind of practice should I do?
When it comes to asana on holiday - practice non-attachment! Yoga is much more than just doing your asanas. Engage in the Yoga of action as you see new places and meet new people. Allow yourself to be open to the other types of transformation that a voyage opens up in us.
When you get home
Sometimes, returning from a trip is also an ideal time to start a new routine, maybe something you've been meaning to do or let slip along the way. Again, the best time to start is as soon as you get back, before you get swept up again in your old routine.
 |
| My luggage - all of it! - on my recent 3.5 week trip to Congo. I loved how light the travel yoga mat was - but I wish I'd put it in a mat bag, because it got pretty dirty along the way! |
More and more of us are traveling in this day and age, for work or for pleasure, or both. And like everything else in our world, travel today is faster than ever before. 100 years ago, it took weeks or months to travel from, say, Europe to America. Now it takes only a few hours. And as anyone who has experienced jet-lag knows, this puts a heavy strain on our body and our metabolism. Our sleeping and eating habits are disrupted, and our bodies can be confused by sudden changes in climate.
With all this going on, maintaining a regular practice while on-the-go can be very challenging: strange cities, foreign languages, jet-lag, busy schedules, cramped hotel rooms and smelly old hotel carpets are only a few of the limitations! All this assuming that you are able to practice on your own, away from your favourite classes and teachers.
If you are planning an upcoming trip, here are a few simple questions and answers that might help you prepare to take your practice on the road!
Before you go
How many yoga outfits should I bring?
Ok, if you are like me, packing is a serious exercise in making tough choices. But from my experience: Pack yoga-light. Unless you're going on a yoga retreat, realistically you'll only need one set of clothes (gasp!) for your holiday practice. However, with how stylish yoga clothes are getting, if you are going to be doing a lot of sightseeing or hiking you might be able to create other outfits with your yoga gear, too. And don't forget to think about the climate where you are going - if it's different to where you came from, you may want to pack a yoga outfit that you can layer up or down.
Should I bring my yoga mat?
Ok, the hard answer to this question is: probably not. A yoga mat is a real pain to lug around when you are on the move, and unless you are a SERIOUSLY committed yogi or yogini who maintains your daily practice even if it means missing the bus to go see the Acropolis, you probably won't use it enough to justify carrying it around.
However, if you do have a home practice, I do recommend investing in a travel yoga mat! One that I have used is the YogiToes skidless "yoga-towel", which to me is a great compromise. It's not perfect on hard floors, but laid out on a hotel carpet it's fairly grippy and a lot easier to pack. Plus, easy to wash!
Recently I did a 4-week trip with the Lululemon Travel Mat, which was also pretty good. Again, it doesn't give you any support on hard surfaces, but weighing less than 1kg it was pretty great given that I was traveling on small planes where the maximum weight limit is carefully monitored. I liked that it feels like a regular yoga mat and is just as grippy. It weighs about the same as the yoga towel, but it's not as easy to pack or to wash.
How will I practice?
If you don't have a regular home practice, it will be worth spending time to write down a sequence you can practice while you're away. Use your favourite book or DVD, or ask your teacher to help you - I would advise aiming for a 45min-1hour sequence. If you do have a regular home practice, see the next section.
While you're there
How much will I practice?
You can practice yoga every day, but your holidays may only come around once in a while, and you want to make the most of that time!! So be prepared to modify your practice and accept that you probably will not practice as much as you do at home. A rough guideline based on my experience when traveling as a tourist is half as often, and half to 3/4 of the usual length of practice.
What kind of practice should I do?
Travel can be stressful to your body, and we all carry that stress in different places. Be prepared to listen to your body's needs and modify your practice accordingly. If you are carrying heavy bags, you may want to focus on poses that loosen up your back, neck and shoulders. If you are doing a lot of walking, you might want to go easy on the standing poses and practice a sequence of restorative forward bends and some inversions to give your feet a rest. Feel uprooted from the air travel? Try solid, grounding standing poses that open up your hips and, hopefully, your mind.
How will I squeeze my regular asana practice in?
When it comes to asana on holiday - practice non-attachment! Yoga is much more than just doing your asanas. Engage in the Yoga of action as you see new places and meet new people. Allow yourself to be open to the other types of transformation that a voyage opens up in us.
All the new sensations, sights, smells and tastes you encounter when you travel to a new place can be overwhelming! Try to make time in your busy schedule for meditation or a restorative practice, or keep a journal of your trip. Whatever works for you, give yourself some you-time to process all your new experiences.
When you get home
Sometimes it can be hard to get back into your regular routine. My advice: start straight away (or as soon as your jet-lag permits)!
Sometimes, returning from a trip is also an ideal time to start a new routine, maybe something you've been meaning to do or let slip along the way. Again, the best time to start is as soon as you get back, before you get swept up again in your old routine.
----------------------------------------------------------------
Those are a few things that I've gleaned from my travels - as always I would love to hear your experiences, comments and feedback! Have you done
Thursday, June 6, 2013
Brief hiatus while I... move to Australia!
Yes, dear readers, the Gypsy is on the move again! You may have noticed that my posts have been a bit scarce of late, and that's because, as the title of this post suggests, I'm in the middle of moving... to Australia!!
Yep, I have packed up my worldly possessions (again), and am headed for the sun, surf and sand of Sydney! Needless to say I haven't found a lot of time for blogging with all that going on... But I do have some reader-requested posts in the works including: preparatory poses for Warrior III, relieving jaw tension, and yoga for people with hyper mobility or hyper flexibility. So stay tuned!!!
To keep you busy, while I'm away I'll be re-posting a few older posts purely for your enjoyment - and I'll pick back up in a few weeks at the most, maybe less. :)
Meanwhile, this last week I had the chance to relive a little bit of my personal history by driving through the Canadian mountains from Whistler to Kamploops, British Colombia. Here are some pictures of that stunning countryside that makes my heart sing.
Maybe I'll always be a gypsy, but there is nothing like the homeland to make my heart sing. Farewell for now, Canada! I will miss you.


Subscribe to:
Posts (Atom)