Showing posts with label yoga tip tuesdays. Show all posts

Tuesday, June 24, 2014

Yoga Tip Tuesdays: the 'other' shoulderstand

When you think of shoulderstand, you probably think of the popular images of someone upside down with their legs ramrod-straight in the air, their body folded nearly in half at the neck, their chin pressed to their chest. Yet let's face it - the modern, "gymnastic" version of shoulderstand that we are used to seeing is simply not practical - or safe - for everyone. It requires a high degree of backwards flexibility of the shoulders, for starters. It also requires nearly 90 degrees of forward flexion at the cervical spine and places a lot of the body's weight on the delicate vertebrae at the back of the neck. Not to mention that if you are a woman with anything over a C-cup, you may feel like you're at risk of smothering yourself!

Thankfully, there is an alternative variation of shoulderstand that gives you exactly the same benefits as the "gymnastic" shoulderstand. In sanskrit this pose is often referred to as "viparita karani asana." It's basically a slightly modified version of shoulderstand, where instead of trying to get your body straight up and down, you allow your body to settle in a 'pike' pose, with a comfortable angle between the torso and legs. This allows you to take more of the weight of the body in the hands, elbows and arms, which decreases the weight and pressure on the cervical spine. It also creates more 'breathing' space between the chin and the torso - ideal for bodybuilders with tight pecs and shoulders and for busty women. The pose has a beautiful, mudra-like feel to it and allows you to breathe deeply into the belly. Drishti is either straight up, or at the belly if you can do this while still keeping the chin lifted high.

I can not say enough how much I love and prefer this pose!! Personally, I now only practice this asana instead of shoulderstand and I always teach it in classes (I call the two versions "classical" shoulderstand and "gymnastic" shoulderstand) - yet it took me years to come across it simply because it isn't taught in our modern asana classes. So without further ado, here you have it: viparita karani asana.


(NB: The usual counter-indications for this pose apply: you shouldn't be practicing inversions if you have untreated high blood pressure, angina, glaucoma, or osteoporosis of the spine, wrists or shoulders.)

Readers, what poses would you like to see modifications for on the blog??

Wednesday, February 12, 2014

3 simple, awesome hamstring stretches

I have been meaning to write this post for ages, and was reminded of that intention by a reader comment the other day requesting some stretches for the back of the knee. As you might know, that big old hamstring muscle attaches at the back of the knee, so here are a few stretches to help you get into that tight area.

There are lots of ways to do this, but I like these ones because they are simple, straightforward, and safe on the back, which many hamstring stretches are not. I don't think any additional descriptions are required, but if you have any questions, just ask in the comments! And don't forget to let me know if there are any things that YOU'd like to see covered on the blog. Enjoy!

[NB: Knee pain, especially from bent knees, can be a symptom of wear to the knees' precious, protective cartilage. If you experience joint pain in your knees - and especially if you are high risk for cartilage damage, e.g. you are a runner or have a history of being overweight - you should definitely see your doctor! These stretches will ease muscular tension only.]

(click to see a larger image)

(click to see a larger image)

[For the anatomy geeks: These stretches are based on the principle of isometric muscle activation. Essentially, in the body's everyday movement, muscles work in pairs: when the quadriceps (thigh muscles) contract, the hamstrings lengthen. So, by strongly contracting the thigh muscles in short bursts, we encourage the hamstrings to lengthen. It's a great, no-pressure way of stretching.]

Tuesday, February 4, 2014

Yoga Tip Tuesdays: Sage Balance II (Eka Pada Koundinyasana 2)

This week's yoga tip is a about a challenging arm-balancing posture, eka pada koundinyasana 2 (one-legged sage pose 2), EPK2 for short! This pose often follows Lizard Pose in more challenging vinyasa classes, and for those of you who are comfortable in Lizard and want to challenge yourselves a bit more, the preparatory steps towards EPK2 are a great way to explore your boundaries and push out of your comfort zone a little.

Before you start working on this pose, make sure that you have warmed up the hips, hamstrings and upper body. You'll need a nice strong chaturanga to take the full balance, but if you are still working on that, the preparatory postures are good at building strength, too!

Remember if you are just starting to work on this pose to take it easy! There's no rush. You may play with each step in the process for weeks or even months at a time. Take each challenge as it comes, be patient with yourself, and be consistent, and you will see results in time. As a guideline, you should aim to be able to hold each step comfortably for up to a minute before progressing to the next step.

Start by taking a long, deep Lizard Pose on each side to warm up. Then come back into Lizard pose on the first side.


  • If you can get your elbows to the floor in Lizard, begin by walking your elbows back as far as you can. If you can't get your elbows quite there, then walk your hands back. Either way, you should end up with your arms in chaturanga.
  • As you bring your arms into chaturanga, one arm will come into contact with the back of your leg (in the photos below, the left arm and left leg) and the weight of the leg will start to transfer to your upper arm. This contact point is really important so play around with it until it feels comfortable. As a general rule, you can't to get the contact point as high on your upper arm as you can. (2nd picture, below)
  • Once you feel comfortable, begin to walk your front toes forward and out on a diagonal. You'll feel more of the weight of the leg transferring onto your upper arm. At this point stop and make sure your body is properly supported: squeeze your upper arms towards the midline and press strongly through the pads of the fingers, lift from the core (like in plank pose), and strongly engaging the back leg and heel.
  • Now we're going to try and straighten the front leg. To support yourself in this half-balance, you'll need to drop into a strong chaturanga. At this point I find it helpful to turn my head and look towards my toes: this helps me focus my efforts on what I'm doing!
  • Next, extend strongly through the front thigh and begin to straightening the front leg. Really think about lengthening, not about lifting: by virtue of extending, your toes will eventually lift off the ground.
  • Once you can get the toes off, refine the posture: flex or "floint" the front toes, keep the back leg super-engaged, and see if you can come up onto tiptoes on the back foot. When you can get the back foot high, high on tiptoes, then you're ready to try the next stage.


  • Think of the body as a seesaw, with your elbows as the centre. The easiest way to get the back toes up, is for the weight of your front body to move forward and down. So this critical stage is mostly about pivoting your weight forward until your back toes can't help but lift off. Keeping the front leg strongly engaged and extending will help you bring your weight forward without collapsing onto the mat.
  • When you're just getting started with this pose, it can help to take tiny 'hops' to lift the toes off the ground. Keep in mind though that these hops should be really tiny and that the main "work" of this stage is shifting your weight forward enough so that the back leg becomes light. I also find that it really helps to turn your head to the side here. This eliminates any risk of nose-squash if something goes wrong and helps keep your focus on your front leg, which needs to stay really strongly extending through this step.
  • Once you have a bit of lift-off,  keep the forward leg strongly engaged, keep squeezing in through the upper arms, and keep lifting from the core. It's hard work!!
  • Over time, refine the pose by trying to find a more even distribution of weight, lifting the chest away from the floor, extending from the breastbone, and bringing your gaze forward.


  • PS: I've included a picture of the other side here, because when I was first starting out with this pose I couldn't figure out what to do with my other arm. In fact when I first played with this pose, I used to cheat by sneaking that free elbow underneath my hip. I don't discourage this little 'cheat' if you are just trying to get a feel for the pose, but in the full pose the elbow is free and hugging strongly into your side. Squeeze as if your life depended on it!! (Note how you can really see that this is my weaker shoulder from the photos!)

I hope this was helpful! Readers, are there any poses that you'd like to see on this blog?

Friday, January 17, 2014

Quick Tip: How to check your knee alignment in Warrior II and similar poses

Knees are delicate joints, which is why yoga teachers tend to go on (and on!) about correctly aligning the knee in yoga poses. Unlike hips, which can move in many directions, knees are designed only to move in one direction. So when we do yoga poses, it's important to respect the way that knees are designed to move, otherwise we risk injuring this relatively delicate joint. Knees are hinge joints, designed to move on a single axis, just like the hinge of a door. And just like a hinge, they are especially vulnerable if you twist them away from that axis.

In standing poses where the knee is bent, correctly aligning the knee is especially important because the knee joint is bearing weight. In poses where the hips are facing forward, the body finds a safe alignment fairly naturally, just as it does every day when we walk or run. However, in poses such as Warrior II and extended angle pose (and Warrior I to a lesser extent), we put the body in an un-natural stance, with the pelvis facing sideways and the front foot facing forwards. When we then bend the knee, our body often comes out of its safe alignment, for a number of different reasons (stiffness in the hips, short adductor muscles, distraction…).

You'll often hear teachers cue "bring your knee over your ankle" to try and correct for this. But we all know that bringing the knee directly over the ankle in these poses can take years of practice! Instead, don't worry about how far forward your knee is: check the alignment of your knee by thinking about lining up two straight lines. The first (in pink) is a line that goes through the middle of your foot: approximately from the base of the second toe to the middle of the heel. The second (in blue) goes from your hip socket in the middle of the upper thigh to the middle of the kneecap. When those two axes are in line, you are good to go!

The pictures below hopefully makes it pretty clear. In 1) and 2) I've shown two common mis-alignments that I often see in class, just to help illustrate the point. 3) shows what it should look like.

(PS: You usually can't see your foot from standing in Warrior II, so lean forward to check your alignment, and then straighten up again).


My cat has recently been taking a renewed interest in disdainfully watching me do yoga, so you also get a bonus of some cute little cat feet off to the side!!

Friday, January 10, 2014

Yoga Tip Tuesdays: Lizard Pose

Happy new year! Yes, readers, I'm back at the blog. The final 3 months of last year for me were very intense work-wise, and blogging just didn't fit in. But now all that is behind me and I have lots of time for all things yoga - hurrah!

Now, we bloggers tend to start the new year with deep, reflective posts, but I'm going to skip that step and launch straight into a post requested by a reader a little while ago, on a lovely but challenging hip opener called Lizard Pose. Also, stay tuned for the sequel on how to use Lizard Pose as a starting point to work towards a challenging arm-balance: eka pada koundinyasana (sage pose) II.

-----------------------------------
A little while ago, a reader contacted me through Facebook and asked for advice on modifying Lizard Pose. She commented: "My thigh can't seem to stay straight - it wants to poke out to the side. Then I am having problems with my shoulders. Even getting to where my shoulder is by my knee is troublesome."

First of all, from my perspective, it's totally OK for your front thigh to be angled outwards. After all, your femur sits side-on and forward of your hip joint, as shown in the picture below. As you can also see, this is more exaggerated in women than with men.


The way that the femur and the hip are aligned means that in forward-facing hip-openers (like Warrior I, lunge and lizard), you should always set up for the pose with the feet at least hip width apart on your mat. For women, aim for shoulder distance. This means that the right foot is to the right side of the midline, and the left foot is to the left side. This alone might alleviate any discomfort you're feeling by creating more space for the hip joint to move through.

Next, you can create even more space for the hips with one simple movement: turn your forward toes outward, towards the front corner of your mat. This reflects the natural alignment of the femur, so when you come deeper into the pose, bringing your hands to the mat, you should feel more spaciousness in the hip joint. You can walk your foot further out to the side to get even more room.

When you can comfortably hold the pose for 5 breaths with your palms flat on the mat, you can play with coming a bit deeper into the pose by bending your elbows. Another way to explore this pose is with the back knee on the ground. This takes some of the weight off the hip joint and can be a great variation for those with especially tight hamstrings.

Eventually you might place your elbows on a bolster, block, or on the floor. However remember that this pose is not about how far down you go. It's totally fine if your shoulders never go lower than your knee - as long as you are feeling a good stretch in your hips, glutes and hamstrings. Be respectful of your body: since hips are joints, there is no joy to be had in straining to push your limits. Rather, let go of your ego, breathe deeply and work on holding the pose longer while staying relaxed through the breath, allowing your body to slowly change old patterns of movement.

Lizard Pose is a big hip opener, so before coming into this pose, do some warm ups like hip circles, supine pigeon, and lunges. Enjoy!!


Readers, what are some poses you'd like to see featured on Yoga Tip Tuesdays? And yes, I know it's not Tuesday today, but whatever! ;) The name is catchy.

Tuesday, August 6, 2013

Yoga Tip Tuesdays - Triangle Pose: Choosing what's right for you, with 5 awesome variations


Ah, triangle pose (tri-kon-asana - three-angle-pose). It's one of the foundational postures of modern yoga (ancient yoga didn't involve any standing postures) and you will probably find it in nearly every yoga class you go to. Because of that, you'll probably find that different yoga styles approach this pose differently, and you may have seen different teachers doing quite different variations of this pose. So all that might leave the yoga student wondering: "which one is right?" Which is totally understandable, but it's not the right question.

The real question is: "which one is right for me?" Now that question, we can work with!

When exploring a yoga pose, whether it's a new one or one you've done a hundred times, there are three simple steps that I have found really helpful over the years.

1) Start with the foundation, and work your way up and out.
2) Remember: function over form!
3) Try different variations

Triangle: The foundation


The foundation of triangle pose is, of course, the feet, which form the base of the pose. The classic alignment cue for the feet is to turn your front foot forward 90 degrees, turn your back toes forward between 30 and 45 degrees, and align the heel of the front foot with the inner arch of the back foot. This is picture b), above.

However, triangle pose requires a fair degree flexibility and range of motion in the hip joint (not to mention flexibility in the hamstrings and groin), so if you are just starting out, if your hips are stiff, if you have trouble balancing (for example because you're pregnant!) or if you're recovering from, say, hip replacement surgery, you can make the base of the pose more stable by having your feet hip-width apart, as shown in a), above. Some teachers cue this by asking people to imagine that their feet are on "railroad tracks," so if you stand with your feet hip width apart, you can move the feet forward or backwards but not wider apart or closer together than hip width. This (a) is the most stable, safest placement for the feet.

Finally, a note on what not to do: don't let the back heel stray backwards of the mid-line of your body! This really destabilises the pose and puts unnecessary strain on the hip joint.

[There is actually a third option which is to keep the feet parallel - we'll talk more about that in the Variations section, below.]

Function over form


Ok, let's be honest. We have ALL seen the photos in the yoga magazines with people doing triangle pose with one palm resting flat on the ground. And even though we are trying to be all "one with where we are," we just can't help it: we WANT that hand to touch the ground. So we creep a bit lower, and a bit lower, and a bit lower, and even though we have kind of lost the stretch a bit, we finally arrive, triumphant, with our palm flat on the mat. Victory! Or not?

Well, have a look at the first picture, above, for an idea of what this kind of thinking actually looks like on the mat. It's a pretty typical illustration of how the mind plays tricks on us and gets in our way (what Patanjali called "false perception," (1.30))! We are confusing the form of the pose, a form that we have seen in a picture, with the actual function of the pose. Our ego drives us to achieve the form, and suddenly we are out of our bodies and our breaths and catapulted into a mentality of hand-to-floor-OR-DIE!, when in fact the function of the pose has absolutely nothing to do with where your hands are.

The actual functions of triangle pose are to stretch the front hamstring and psoas, and the upper side and back muscles (with a secondary stretch in the back hamstring and groin muscles).

So keeping that in mind, if we look at the first picture above, in my desire to get my palm to the floor, I have lost the lengthening stretch in the upper side and back. The photo shows just how far off my alignment I have come, all because of that pesky fixation on the floor! In order to get the stretch that I am supposed to be getting, I want my hips and shoulders to be more or less in line with back foot, creating a big lengthening stretch in the upper side-body. Depending on the day, the temperature, the time, and of course, on my body, I may want to explore a number of different variations to get that wonderful, therapeutic stretch from this pose.

Variations

Triangle pose probably has the most variations of any pose I know! ALL of the poses shown below achieve the function of the form. Once you've understood what the function of the pose is, try them all to see how the different variations feel, and which one gives YOU the best stretch.

PS - the "ticks" and "xs" below are definitely not a comprehensive list of recommendations or contra-indications for these poses... Just suggestions. We are all different! If you are recovering from an injury or have a condition like osteoporosis, work with an experienced teacher to find out what's right for you!

  • Hand-to-shin variation: This variation is definitely the most versatile and accessible (no props required!). Simply place your hand on your shin, below the knee, as you extend sideways. To get a deeper stretch, bring the hand lower on the shin, towards the ankle. I don't recommend this variation if: you tend to hyper-extend the knee backwards (because the weight of the hand can make this worse), or if you have weak joints or osteoporosis (same reason).
  • With a block: This variation closely resembles the previous one, but using the block is safer for the knee joint because you can put weight on the block, instead of on your knee! For that reason, this variation is excellent if you are very heavy set or if you are pregnant. Depending on the person and the height of the block, this variation might be suitable if you have osteopenia or osteoporosis, but because yoga blocks are generally quite low to the ground it does still require a fair range of motion in the hips, which is not suited to everyone. I would not recommend this variation if: you have a lower back injury, or if you have severe osteoporosis. If you have  had hip replacement surgery and have recovered your normal range of motion, this would be a good variation, but not during the recovery phase.
  • With a chair: This variation is, in a word, awesome. Using the chair creates a safe support for the stretch that makes it accessible to almost anyone. For extra stability and support (helpful if you are heavily pregnant or for older people who are afraid of falling) you can also do this stretch with your back against a wall to make it safe, supported, and truly sweet.
  • Viniyoga triangle: This is a fantastic variation if you have a more limited range of motion in your hips. This might apply if you are still recovering from a hip replacement, if you have osteoporosis, or for any other reason. In this variation, your feet remain parallel and you simply stretch to the side. You lose the hamstring stretch, but there are other ways to get that. The side stretch is spot-on!
  • Open chain triangle: This is a good option if you have strong joints and are generally injury-free, and want to add a strengthening aspect to your triangle pose. Doing triangle pose "open-chain" (without the support of the hand) means that the side-stretch also becomes load-bearing, so you are strengthening and stretching at the same time. This also creates a greater risk of injury, so I would not recommend this variation if: you have lower back injuries, if you have weak/injured joints or osteoporosis, if you are still recovering from a joint replacement. If you have hypermobile hips, I would not recommend this posture until you have some yoga experience and have built up the strength in your lower back and core, because otherwise you are likely to "hang" into your hips and put extra pressure on the joints. However once you have built up your strength and know how to support your joints, this is an excellent variation for you.
  • Fully extended triangle: These versions are the ones you are most likely to see in books and magazines, and they are wonderful if you have a strong, flexible and healthy body, and no injuries or issues with your lower back, knees or hips. Just make sure that you are retaining the function of the posture as you work towards the form! Note that if you have hypermobility, generally the most extended versions of postures aren't recommended.
 [NB: I've shown different variations here mainly focusing on the hips - if you have a shoulder injury you would also adapt this pose by changing the position of the arms.]

Yoga is about self-inquiry - so be curious!

Don't forget that yoga, fundamentally, is about self-inquiry. Use the poses as a chance to express your curiosity ("what happens if....") and try as many variations as you can. With each variation ask yourself: "how does this feel?" "what feels different?" "what feels good or not good?" And when you find the one that feels best for you in that moment (because everything changes, always!), be bold, and express yourself, no matter what everyone else around you is doing. Because at the end of the day, it's YOUR yoga.

Tuesday, July 9, 2013

Yoga Tip Tuesdays: 3 great ways to modify Pigeon Pose

Pigeon pose (we are talking about supta eka pada rajakapotasana here, to be precise) is a hip-opening forward bend that is a staple of modern vinyasa-style yoga classes. And for good reason - it stretches the psoas and hip flexors of the extended leg, and the gluteus minor of the bent leg, all the while opening the hips. Yum!

However, supine pigeon can be a tough pose if you have a more limited range of motion in your hips, or if you have delicate knees (the two are often connected by the way). So here are three great ways to modify your pigeon pose in class or at home, and stay safe while still getting all the great benefits of this pose.

Note: If you have recently had hip or knee surgery including a hip or knee replacement, the third pose - Upside-down pigeon - is the one for you! I wouldn't recommend the other two until you have recovered at least 70% of your normal range of motion - and even then, practice them carefully and preferably with the supervision of a qualified and experienced teacher.

Alignment

First of all, a few thoughts on the alignment of this pose. As a teacher, I see a lot of lop-sided pigeons: that is, where people's bodies create an 'escape valve' for the big hip-opener by collapsing off to one side. I suppose that a lop-sided pigeon probably doesn't do anyone any harm - but I'm not sure it ever did anyone any good, either.


To truly get the benefits of pigeon pose, you ideally want your pelvis to remain square towards the front of the mat, with the hips more or less at the same height. Now, unless you have naturally very open hips, this is going to be tricky for most of us - which is where these modifications come in.

Now, I have encountered many yogis and yoginis who are reluctant to modify poses, especially if it involves using a prop. Personally, I think this attitude is more likely to be driven by ego than by wisdom, although to each their own. In any case, I like to think of it this way: doing poses with the appropriate modifications and props is like taking practice questions before an exam. It's not a 'cop-out': it's a smart way to prepare your body for going deeper and, above all, to protect yourself from injury.

1. Propped-up pigeon

This is a perfect modification for those people who can approach the shape of Pigeon but feel a bit of a twinge in their knee when they try to bring the front leg a bit more parallel to the mat.  It is also ideal for those who feel restricted in the groin area while doing this pose.

Let me start by saying that I am a HUGE fan of this variation. It's simple, retains the form of the pose, and all it requires is for you to grab a blanket, block or bolster at the beginning of your practice and have it handy by your mat. Then, when you come into pigeon pose, simply place the blanket/block/bolster underneath the buttock and upper back of the thigh of the leg with the bent knee. Et voila! A propped up pigeon that will allow your pelvis to be forward-facing and even so that you can externally rotate the front hip, bringing the front knee more parallel to the front of the mat for a deep but safe hip-opener.

NB: You will probably find that you need to work with different heights on different sides of your body, as most of us have one hip that is more open than the other. That's normal - embrace the difference and don't try to force both sides to be the same.

2. Swirly pigeon

I call this second variation 'swirly' pigeon, because your legs are doing a sort of a swirl around your body. [Points to the reader who comes up with a better name!]

For this variation start by sitting with one knee bent (this will be the back leg) and the other shin reasonably parallel to the front of the mat. Slowly swing the bent knee back so that your back thigh is parallel to the front shin. At this point you can asses whether it will help you to add some padding underneath the buttock of the front leg - I recommend it!  Finally, twist your torso slightly so that you can place your hands on either side of the front thigh. Either stay there, or deepen the stretch by coming into a forward fold.


3. Upside-down pigeon

Of the three, this variation is the safest and most accessible. You can do this variation even if you have recently had a hip or knee replacement or any other kind of surgery on those areas. This is also a safe and satisfying hip opener for anyone with lower back or sacrum issues, because your back is fully supported by the floor. And, it means that you don't have to sit this pose out while in a group class: simply flip it upside-down and get exactly the same stretch, without all the strain.

For this version, start by lying on your back with one knee bent. Gently bring the other knee towards your chest and carefully place the ankle of the lifted leg over your knee. Next, reach your hands either side of the grounded leg and clasp the back of the thigh or front of the shin, using a small towel or strap if appropriate - your head and shoulders should stay on the ground. Slowly draw your grounded leg in towards your body until you feel a deep stretch in your floating hip and buttock. Breathe deeply and try to relax! To get a deeper stretch, try to open your floating knee away from your body as you draw the other leg closer.


I hope that was helpful! I'd love to hear your experiences with pigeon pose and any tips and tricks that you've picked up along the way to make this pose enjoyable and safe. :)

Tuesday, June 18, 2013

Yoga Tip Tuesdays: Preparatory poses for Warrior 3

Hello everyone!

A reader left the following comment on a post about Warrior III: "I still have a hard time maintaining this pose. Are there any easier poses that will give me the strength to execute warrior pose 3?"

Warrior III is a challenging standing balance - a real power pose, but also one that requires heart. Any pose that requires heart also requires us to be compassionate with ourselves - so keep that in mind as you work towards this challenge. :)

There is a lot going on in Warrior III, but for the purposes of this post, there are two main aspects that we are going to work on to build more stability and ease in this challenge pose. Each aspect is an opposing pair, or muscle groups that work together:
  1. Strong quadriceps and long hamstrings
  2. Strong core and lower back
Depending on the individual yogi, you may want to work both of these areas, or one might give you more trouble than the other. As you go through the exercises below, take the time to observe how they feel for your body.

NOTE: Warrior III is a strong pose. The exercises below are not recommended if you have any injuries or have recently had surgery, especially but not limited to back injuries, hip or knee replacements, or a caesarian section.


1. Leg lifts
Stretches the hamstrings and warms up the abdominal muscles.

Lie on your mat with your arms stretched out overhead and your feet flexed. As you exhale, use your abdominal muscles to draw the lower ribs down towards the floor and tuck the belly button towards the spine.

On an exhale, slowly raise one leg in the air. On an inhale, slowly lower the leg. Try to use the core muscles to initiate and sustain the movement - not the muscles of the leg.

Do each side 4-10 times.

Think about it: If you are able to raise the leg to about 90 degrees, then you are exactly imitating the alignment of Warrior III, only lying down!! If you can't get the leg to 90 degrees while keeping it straight, then you will need to work on your hamstring flexibility to achieve the full pose.

Make it easier: If you feel any stress in your lower back, try bending the non-active leg and placing the foot on the floor, or bring your arms down by your sides, or both.

Make it harder: Raise and lower the leg in 4-6 increments, exhaling to move the leg and inhaling as you hold.


2. Balancing cat
Warms up the abdominals and the lower back muscles.

Come to all fours with your hands underneath your shoulders and your knees underneath your hips.

Firm through the core and then lift one leg, stretching it straight out behind you. Keep the leg at the same height of your torso (many of us tend to lift it too high!) and strongly lengthen through the thigh and the heel as if you were pressing your foot against a wall. Or, even better - press your foot against a wall!!

If your balance fees comfortable and stable here, lift the opposite arm and stretch it out in front of you. Keep the arm about the height of your ear - you are trying to create a straight line from the heel, to the hip, to the shoulder, to the ear, to the fingertips. Keep your neck soft and long. Keep your abdominals engaged.

Hold for 3-5 breaths, repeat 1-3 times on each side.


Think about it: This is basically the shape of Warrior III only with one knee bent and one arm down. Feel how you can use your core to support yourself as you lengthen through the fingertips and through the heel of the outstretched foot. Practice inner rotation on the raised thigh, dropping the hip down and extending through the heel.

Make it easier: Don't raise the opposite arm.

Make it harder: Do a series of crunches before holding the pose: as you exhale, round the spine, lift through the core, and draw your raised knee towards your nose. As you inhale, straighten the leg.


3. Intense side stretch variation
Stretches the hamstrings and strengthens the lower back, one side at a time.

Come to standing with your feet hip width apart. Step one foot back so your feet are about a leg's length apart. Turn your back foot so the toes are pointing forwards or at a 45 degree angle.
Place the arm corresponding to your front leg on your lower back. Raise the opposite arm and as you exhale, keep the arm extended as you come all the way down into intense side-stretch. Inhale here.

Exhale, lift your extended arm halfway, bringing your torso parallel to the ground. Inhale, hold. Exhale, come back down.

Repeat 4-6 times on each side.

Make it easier: If you have tight hamstrings, you don't need to come all the way down in this pose. Just come as far as is comfortable, and then lift back up. Even if you are only lifting an inch or two, you will still be getting the benefits of this pose!

Make it harder: On your last repetition, hold the lifted position for 3-5 breaths.


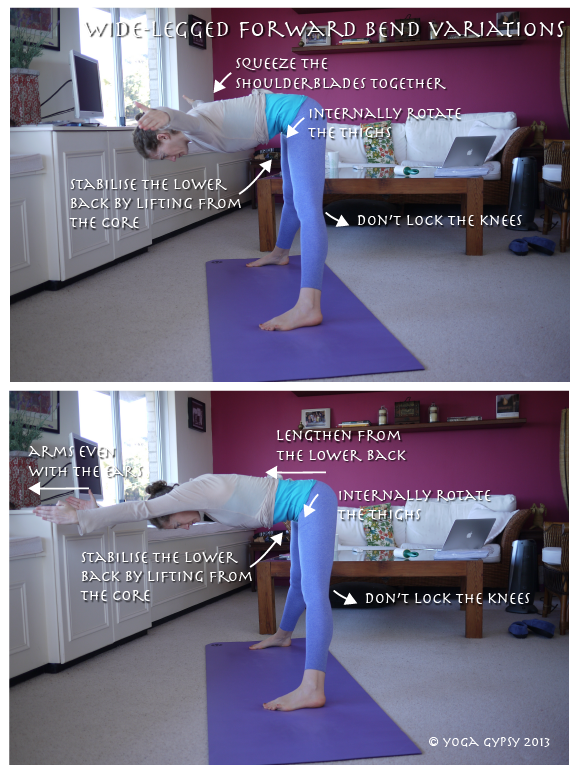
4. Wide-legged forward bend variation
Strengthens the abdominal muscles and the lower back muscles, both sides together.

Stand sideways on your mat with your arms stretched out to your sides. Your feet should be wide apart, but no wider than underneath your wrists - if you bring the feet too wide you will lose stability in this pose.

Exhale, and draw the belly muscles in towards the spine as you bend forward from the waist, keeping the arms outstretched. Keep your thighs internally rotate and don't lock the knees, but keep your thighs strongly engaged in this pose.

If this feels ok, try the following:

Exhale, extend the arms out in front of you, arms even with the ears.

Hold each variation 3-5 breaths, being observant that you are not feeling any strain in your lower back.

Make it easier:  Keep your hands on your hips or bring them into prayer position.


5. Warrior III variations
Try these variations on the full pose.

With all those warm ups, try the following variations on the full pose! You can practice these at home or bust them out in class.

a) Warrior III with your hands on a chair - helps you to get a sense of the shape of the full pose and get a great lengthening stretch, without having to worry too much about losing your balance! You can also do this with your back heel pressed against a wall to get a real sense of how to engage your back leg.


b) Warrior III with your hands in prayer - brings the centre of gravity back and takes the stress off the lower back. This variation is especially recommended if you feel strain in your back when you attempt the full pose.

c) Warrior III with your arms outstretched in "airplane" - brings the centre of gravity back and lets you use your arms a bit to help with balance. This version is great if you keep toppling over in the pose!


---------------------------------------------------------
As always, I love your comments so please leave your feedback! Was this tip helpful?What else would you like tips about?

Saturday, May 11, 2013

Yoga Tip Tuesdays: Downward-facing dog with bent knees

Ok, ok, so it's not Tuesday, but I want to keep this part of the series, and I don't want to wait until Tuesday because this post is in response to a reader request. Brad, I hope you are reading, because this is for you - sorry it's taken me this long to answer!

Brad recently left this comment on one of my posts: "I am just starting out in yoga and I cannot do the downward dog pose with my legs straight. Are you able to show a post for beginners how to do the downward dog pose (for example with bent legs) and then how to slowly build up to doing it properly."

This is an AWESOME question, thanks for asking! So many of us, especially if we gravitate towards a vinyasa, ashtanga or flow-style class, will struggle with what feel like endless repetitions of downward-facing dog. I remember the flood of frustration and despair when one of my early yoga teachers used to quip "remember, downward-dog is supposed to be a resting pose, so just relax!" I would be there, quivering and trembling in the pose, just trying to hold it together, thinking "relax?! is she nuts?!"

Anyway, whether you find it relaxing or not, here are a few tips for how to modify downward-facing dog with bent knees, while still getting all the benefits of the pose. This is not just for beginners! In fact, I often get my intermediate students to practice this pose with bent knees in order to really get a sense of where the focus of the pose is.

1. Downward-facing dog in a class setting

First, it's important to remember that a yoga pose is not about "the pose" - it's about what the pose is doing for you. So when we modify a pose, we want to keep in mind what the pose is really about. In downward-facing dog, the primary anatomical focus is on elongating the spine and opening up your upper back.

So, it doesn't matter if your knees are bent, because this pose is not really about lengthening the hamstrings. Let me repeat: it doesn't matter if your knees are bent.

Here's what  does matter:
  • Your hips need to be high enough so that gravity can work its magic, and your whole spine can extend downwards from the pelvis
  • Your upper back needs to be broad, long and soft, and the backs of your shoulders should be opening - so that means that your centre of gravity has to remain in the pelvis, and most of your body's weight has to remain in the legs and feet
  • Your back needs to be long and fairly straight (apart from the natural curves of the spine), from the tailbone all the way through the back of the neck

So, let's have a look at two variations for downward dog with the knees bent, one in which you are still getting the benefits of the pose, and one in which you are not:


In the first picture, I am making a common mistake by focusing too much on trying to get my legs straight. As you can see, the spine isn't really getting that extension that we are looking for: the effort of trying to straighten the legs pushes too much weight forward onto the hands and drops the hips too low. The centre of gravity of the pose is somewhere just behind the shoulderblades. The backs of the shoulders are rounded, and, with the neck, working hard. We end up fighting against gravity instead of allowing it to help us stretch. The result is something that is hard work, but that isn't really getting us the benefits of the pose.

In the second picture, the knees are bent more deeply, allowing the focus of the pose to come back to the spine. Without locking your elbows, use the hands to press the hips up and back, and draw the belly button slightly towards the navel, using a bit of core engagement to help keep the centre of gravity in the pelvis. Broaden the toes and press strongly through the balls of the feet - don't worry about working the heels down. Broaden the upper back by wrapping your lower shoulderblades towards the armpits, and feel the backs of the shoulders opening. Keep your neck extending in line with your spine and keep your awareness on the stretch in your upper back and the back of your neck.

Depending on your body, you may need to take a longer stance (i.e. more distance between your hands and feet) in order to make this work. Don't worry if that's the case - just focus on finding that long stretch in your upper back and the back of your neck.

Props and modifications:
 
A really helpful modification if you are just starting out is to do the pose (with the knees bent) with each of your hands resting on a yoga block. This little bit of elevation helps you to bring the centre of gravity of the pose back, so that more of the weight of the pose can rest in your pelvis, legs and feet, and you can start to feel some of the "lightness" that allows you to really let your spine stretch out. I highly recommend doing this if your practice space has yoga blocks available, at least during those moments in class where you are asked to hold the pose for several breaths. This modification is especially helpful if you are feeling the strain of the pose mainly in your wrists, arms or the backs of your neck and shoulders.

Finally, an excellent alternative to those long holds in downward dog is to come down onto your knees and take Puppy Pose, pictured below. As you can see from the photo, by taking the hamstrings out of the equation all together, this pose allows you to get the same awesome stretch in your spine, without putting any strain on the wrists, arms, upper back or the legs. You can also do this with your hands resting on blocks for a bit of an extra shoulder-opener.

It's a great idea to do puppy pose and then downward-facing dog to compare the sensation of stretch in your back. If they feel more or less the same, you know you're getting the benefits of the pose.


2. Downward-facing dog at home

If you are practicing at home, there are SO many everyday props available to help you do this pose. Essentially, these are similar to your in-class modification with your hands on blocks, but at home, you have so many more options that you can use to find exactly the right stretch for you.

Try doing the pose with your hands on a chair, a coffee table, the edge of your bed, your sofa, or the stairs, to figure out what feels right for you. The higher your support, the more you should be able to straighten your legs to get a stretch in the hamstrings while still maintaining the long, straight spine that is the essence of the pose. Please make sure that whatever you use is firmly anchored so that it doesn't slip out from under you!


---------------------------------------------------------

I hope this post was helpful! Stay tuned on the blog for some targeted hamstring stretches and shoulder-openers that may also be helpful!

If you've read this far, I'd love your feedback! Was this tip helpful? Is there anything else you'd like tips about? Leave a comment!

Wednesday, March 27, 2013

Yoga Tip Tuesdays: How to keep a straight leg without locking the knees

On a previous Yoga Tip, a reader left the following comment: "I'd love some tips on how to keep a straight leg without locking the knees in balance poses."

This is an excellent question! Many of us have probably heard yoga teachers talk about the importance of not locking the knees in standing and balance poses.  Without going into too much anatomical detail, this is important for the following reasons:
  • If your knee is locked in a balance pose, it means that the joint is holding the weight of the body, instead of the muscles. In the long run, this can wear down the protective cushioning around the knee (called the meniscus) and cause wear and tear on the joint, which can lead to pain, injury and possibly conditions like arthritis.
  • If your knee is locked in a weight-bearing standing pose, for example triangle pose, the joint is again at risk, but in addition, because you are now stretching as well as bearing weight, the ligaments and tendons surrounding the knee joint are also at risk of taking the strain of the stretch, instead of the muscles. Since ligaments and tendons are meant to stabilise, not to stretch, this can quickly lead to injury - and a torn or injured ligament takes far, far longer to heal than a similarly injured muscle.
So you might think that we should all just be doing yoga with bent knees all the time and avoid the problem all together. However, if your knees are always bent in standing poses, you are probably not getting the most out of a pose, nor are you stretching and strengthening the body in a balanced way - and you may actually be putting other types of strain on your knee. (**NB: If you are hypermobile or hyperflexible, see note at the bottom of the page).

So, here is a simple 2-step tip on how to keep the legs straight without locking the knee in standing or balancing poses.

Step 1: Build awareness

In the pose you are working with, lift your toes - just your toes! - off the mat.

Yep, that's it - try it! You'll find that it's pretty much impossible to lock the knee while lifting the toes at the same time, because lifting the toes creates muscular engagement, or "hugging in," that brings the weight of the body into the muscles instead of the joint.

Now of course, in the long run, you don't want to be going through your entire practice with your toes lifted up! It's just a "cheat" to get your muscles used to working in a new way.  So once you have built an awareness of what that muscular engagement feels like, you should work towards a techinque called "isometric" or "static" muscular engagement - essentially, engaging a muscle from the inside, without actually moving the body. You might have heard yoga teachers cue this kind of engagement by talking about "hugging the muscles to the bone."

This is Step 2: Isometric engagement of the leg muscles.

To work on isometrically engaging the muscles in your legs, practice this simple sequence. As you move to each step, remember to keep the muscle engagement from the previous step! I find it's best to start practicing this in Tadasana (standing mountain pose), and once you have a good sense of how it feels, then you can apply the same sequence to all your other standing poses.
  1. Begin in a standing pose with a neutral pelvis.
  2. Establish an even weight distribution between the outer edge, inner edge, and heels of your feet, lifting your toes up to do so if it helps. Press strongly through the big toe mound in order to lift your arches.
  3. Keep that engagement and then without moving your feet, try to engage your muscles as if you wanted your toes to lengthen forwards and your heels to draw back.
  4. Next, imagine your shins drawing forward.
  5. Now, engage your muscles as if to squeeze an imaginary yoga block or tennis ball in between your thighs, lifting your kneecaps upwards and drawing the thigh muscles up and back.
  6. Finally, engage your muscles as if you wanted to lift your pelvis away from the tops of your femurs. This one is tricky - just visualise it, even if you can't feel anything happening.
These 6 steps can work to bring engagement to the subtle leg muscles in nearly every standing pose (and even in inversions!), which ultimately will strengthen your standing poses without putting your knee joint at risk.

Here is a quick graphic that you can use as a reminder of the main points:


(and do forgive me the not-so-great alignment of my pelvis in this picture!)


**NB: If you are hyperflexible or have hypermobile knee joints, you will probably need to work with a slight bend in the knee until you can really control the muscular engagement of your legs to fully protect the knee joint. Work with a yoga therapist or a knowledgeable teacher to determine the right way of working for you.

~~~~~~~~~~~~~~~~~~~~~~~~~~~~

If you've read this far, I'd love your feedback! Was this tip helpful? Is there anything else you'd like tips about? Leave a comment!

Wednesday, March 6, 2013

Yoga Tip Tuesdays: Helpful Hints on Stepping Forward From Downward-facing Dog

I love it when people a) comment on my blog, b) find my blog posts useful, and c) ask for particular things on the blog! Please don't hesitate to let me know if these posts are useful (or not!) to you and just leave a comment if there is something you'd like me to post about!!


~~~~~~~~~~~~~~~~~~~~~~~~~~~~~~~~~

On my post about transitioning your toes through the sun salutations, Lynn, a reader, commented: "I am a yoga teacher as well, and have always struggled with both jump to the top of my mat, or to smoothly step forward, do you have any helpful tips for this?"

This is SUCH a good question!! Being able to smoothly move from the back to the front of the mat might look simple, but (as so often in yoga!) it's actually a fairly difficult move for the majority of people. So, whether you are a teacher or a student, it's a very good thing to be able to break down this motion, and to teach it to people of all abilities.

There has been a lot written and demonstrated on the internet about jumping or "floating" forward, and it is a demanding move that I generally don't teach in classes (too much risk of injury when done sloppily) so I'm not going to focus on that. 


Instead, let's have a look at Stepping Forward

If you go to a vinyasa-like yoga class, you will probably hear these words at least 20 times per class: "now step your foot between your hands, and..." Well, for many people, this is easier said than done! If you're not convinced, imagine replicating this move while standing with your palms pressed against a wall! Ok, convinced now?

A little anatomy

Stepping your foot forward from downward facing dog requires a couple of things to happen.  In order for you to lift and bend your knee, your psoas and hip flexor have to strongly engage.  Your psoas is super strong and used to this - it's what it does every time we take a step forward when we are walking!  However, once your hip is fully bent (when your knee comes in towards your body), your psoas can no longer generate any force, which is why we tend to lose momentum half way through. Once you pass that critical point, the weight of the movement must pass from the legs to the arms; with the back, shoulders and core muscles helping to keep lift. Finally, the hamstring has to lengthen and the quadricep engages to bring the bent knee down to the floor and take the weight of the body back to the feet.


The sequence

For this yoga tip, I'm offering a few simple movements that re-create the elements of stepping forward. If we work on those individually, the overall movement will gradually become easier!

1. Nose-to-knee stretch


(click for larger image)

Variation 1

Lie on your back with your hands and feet on the floor. Slowly, without using your hands, bend your right knee and bring it all the way up to your chest. Grab your right knee with your hands, and meanwhile keep your left leg strongly engaged, trying to press the back of your left thigh into the floor.

Next, as you exhale, warm up the core by drawing your nose towards your knee. Try not to use your hands, but instead press the belly back down into the ground and curl up from the core. Inhale, coming back down. Repeat 5 times, optionally holding the last repetition for 3-5 breaths.

Variation 2

This time, try the above exercise with the leg straight.  This stretches out the hamstring, while also bringing an extra stretch to the hip flexor of the grounded leg.

When you've done the right side, repeat on the left.


2.  Cat / cow variation and 3-legged dog variation


(click for larger image)


Come up to all fours. As you inhale, raise your right leg (with the knee bent) behind you. As you exhale, lift your belly button up towards the ceiling, arch your spine, and draw your knee as high as you can towards your chest, and bring your nose in towards your knee.

Repeat this 5 times, and on the 5th repetition try to hold the exhale position for 3-5 breaths. Then do the other side.

The 3-legged dog variation is similar to the cat/cow variation, except in downward-facing dog. As before, on an inhalation lift your right leg up behind you, keeping your hips square. As you exhale, lift up from the core, bring your shoulders over your hands, and hug your knee up towards your chest. Next inhale, lead with the leg and push back.

Repeat this 5 times, and on the 5th repetition try to hold the exhale position for 3-5 breaths.


3. Stepping forward

When the exercises above feel smooth, try stepping forward. Begin just as if you were going to repeat the 3-legged dog exercise, above. This time, when your shoulders come over your hands, use the momentum to lengthen from the hamstring and push from your quad to bring your foot down onto the floor between your hands. If your foot doesn't come all the way, gently walk it to the right place.

As you practice this movement, remember to:
  • Compress the hip flexors on the front leg while keeping the front of the back thigh long and strong, like in nose-to-knee stretch
  • Lift the belly button up towards the spine and the backs of the shoulders strong, like in the cat/cow variation
  • Lift your knee high towards your chest and shift your weight all the way forward onto your hands, like in 3-legged dog
  • Look forward and visualise where your foot should land!! Where you gaze goes, your body - eventually - will follow.
Once your front foot is there, pause, transfer your weight to the forward foot,  and repeat a similar motion with the back leg: lifting up, bending the knee, and gently placing the foot on the floor.  Remember to be patient, breathe deeply, and try not to be attached to the results of the exercise - it's the practice that counts!


~~~~~~~~~~~~~~~~~~~~~~~~~~~~

If you've read this far, I'd love your feedback! Was this tip helpful? Is there anything else you'd like tips about? Leave a comment!