Showing posts with label alignment. Show all posts

Wednesday, February 27, 2013

Yoga Tip Tuesdays: The Lower Ribs "Escape Valve" - A Simple Tip for Back Stability

Today's Yoga Tip is a short but sweet one that will help you to be more precise in your alignment, activate the transverse abdominals, go deeper into the backs of your shoulders, protect your lower back, and improve your overall core stability.

Many of us, when we do yoga, "think" with the front of our bodies. So when we are asked to open the back of our bodies, we unconsciously try to manifest the instruction on the front body.  In some cases this is simply because our minds aren't used to thinking about the back of the body (out of sight, out of mind!). Or we may have tightness in the back body, and so we try to compensate with the front body.

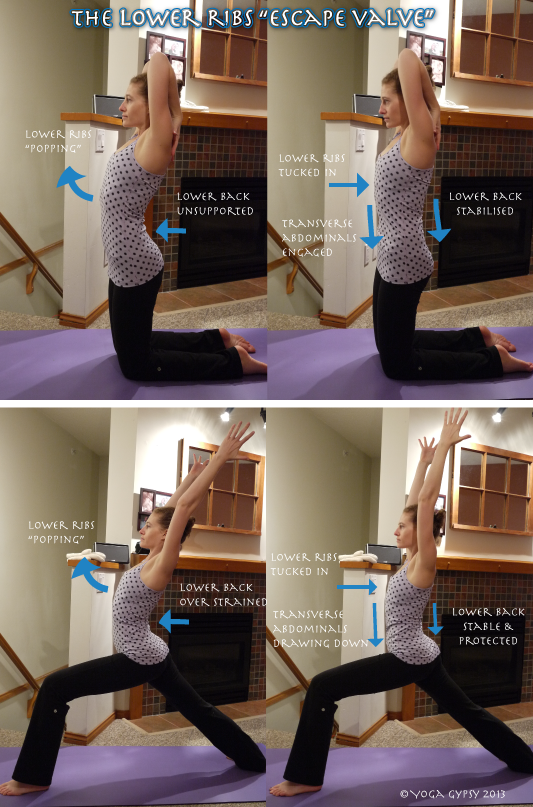
The example I want to look at today is a common one: when working to stretch the backs of our shoulders, or when moving into a backbend, we lengthen our spine, lift our collarbones, and let our lower ribs "flare" or "pop" out. It feels like we are stretching more deeply when we do this, but in fact we are using our ribs as an "escape valve" to compensate for tightness in our back body.

So, what's the big deal? Well, when this "escape valve" becomes a habit, you will carry it with you throughout your practice, including into more challenging poses like backbends.   When the lower ribs are "popped", your lower back isn't being stabilised by its synergists, the transverse abdominals. This can cause excess load to be carried by the lumbar spine (the lower back), which can possibly lead to strain or injury.  You want to be especially careful of this if you (like me) tend towards a "curvy" lower back in general, because it can also mean that your back is taking undue strain even in postures that are not backbends (and probably in your day-to-day life, as well).

In either case, this is really simple to correct once you're aware of it: use your abdominals to pull the lower ribs back in and down and keep them close to your body. Then go back into the pose, staying aware not to let your ribs flare out again.

Clear as mud? Have a look at the pictures!


~~~~~~~~~~~~~~~~~~~~~~~~~~~~

If you've read this far, I'd love your feedback! Was this tip helpful? Is there anything else you'd like tips about? Leave a comment!

Wednesday, August 22, 2012

Yoga Tip Tuesdays: Warrior 3

This week's Yoga Tip is about Warrior III - a challenging standing balance.  Once again, one of the keys to finding a safe & stable expression of this pose is to engage the core muscles and keep the pelvis stable so you support your lower back.

The fundamentals of the pose are to stand on one foot and extend the other leg straight out behind you while bringing the torso parallel to the floor. Already this is pretty tough - it requires strength in the quadriceps and quite a bit of flexibility in the hamstrings to extend the lifted leg straight out. And as if that wasn't tricky enough, in the full expression of the pose you also extend your arms out in front of you.

Whether coming up into this pose from Warrior I or coming down into it from standing, I usually like to approach this pose in two phases: getting the standing balance, and then extending the arms.

Since this is a challenging pose, it can take a long time to find a steady, comfortable expression - they aren't called Warriors for nothing! But no matter where you are with this pose, when coming into the standing balance, here are 2 "don'ts" to watch out for:

1) Don't let the raised hip 'float' up

Since this is an asymmetrical pose, it's almost instinctual for the hip on the raised leg to 'float' open a bit.  This is also an "escape valve" if your hamstrings are tight.

When the hip lifts (external rotation), the pelvis  - and therefore the torso - twist, the standing thigh internally rotates, and this puts pressure more on the knee (and to some extent the ankle), which is supporting the whole weight of the body.  Since the knee is stabilised by ligaments, and since ligaments are connective tissue and can't stretch, putting too much strain on them is a bad idea, and can lead to injury.


Counter the floating hip by:
  • Dropping the raised hip down by flexing the toes and pointing them towards the floor (which internally rotates the thigh); and strongly pressing through the lifted heel. 
  • Engaging the standing quadricep and adding some external rotation to counteract the body's tendency to let the thigh - and therefore the knee - work inwards;
You might feel an increased hamstring stretch as you do this but will also have more stability as you bring the pelvis back in line. Remember not to lock the standing knee!


2) Don't over-arch the lower back

With the combined motion of extending the arms and the back leg, it's easy to give in to gravity and let the front of the body pull downwards, increasing the arch in the lower back. Furthermore, we usually tend to crane our necks to look forward and up in this pose, which exaggerates the arch even more.


Instead:
  • Keep the tailbone lifting as you lift the belly button strongly upwards and 
  • Bring your neck in line with your spine. 
  • Imagine extending between the heel of the raised foot and the crown of the head so the spine lengthens and the arch in your back is minimised. 
The strong core is, eventually, what you will need to hold your arms out in front of you as well.  Remember that your lower back is naturally curved, so we are not trying to eliminate a curve, just to make sure that we are not putting too much strain on the


Modifications:
  • Do the pose with your hands in prayer, hands stretched out behind you, or even with arms entwined, (it makes for a nice vinyasa up to Eagle pose!)
  • Do the pose with your palms pressing into the wall
  • Do the pose with your back heel pressing into the wall
  • If your hamstrings are too tight, allow your knees to bend while trying to keep the rest of the alignment of the pose.
What are your thoughts, challenges, creative modifications or vinyasas of Warrior 3? 


Tuesday, August 14, 2012

Yoga Tip Tuesdays: Utkatasana (Chair Pose)


I have always found chair pose (utkatasana, or "fierce pose") to be a challenging posture for me, and every couple of years I realise that I have been doing different elements of the pose incorrectly. In my recent YTT, I worked on this pose quite a bit, and here is what I have come up with.

First, start working your alignment from the foundation.
  • Your feet should either be together, or a small distance apart (i.e. aligned underneath the sitting bones);
  • Your weight should be evenly distributed between the heels and balls of the feet - don't rock back onto your heels or lean too much into your toes;
  • When you bend your knees, look down along your nose: you should be able to see your toes over your knees.
Once the foundation is set up, move your focus to the pelvis and lower back.  Here we continue in the spirit of my post about pelvic alignment in the transition from plank to upward dog, and apply the same fundamental principles.

Remember that a lot depends on the natural alignment of your spine, in this case of your lower back and pelvis.  There is no one-size-fits-all rule for spinal alignment because we are all starting from very different places! So:
  • If you naturally have a pronounced lumbar curve, you will probably need to tuck your pelvis and reduce that curve; 
  • If you naturally have a very flat lumbar spine, you will want to encourage your pelvis to tilt forward a bit and allow your back to retain some curve;
  • If you have a pretty "neutral" spine and pelvis, then you don't need to do much except maintain that neutrality.
Next, move upwards from the pelvis:
  • Engage the abdominals and draw the belly button towards the spine;
  • Lengthen the sides of the torso and lift the collarbones;
  • Drop the shoulders back and down;
  • Engage the arms as if they could lift you higher in the pose! I have tight shoulders so I keep my hands shoulder-width apart. If even this causes too much tightness, you can also practice the pose with your hands in prayer
Finally, bring your attention to the top of the spine:
  • Keep your neck and head in line with your spine (it feels like you are tucking your chin slightly, instead of craning your neck forward);
  • Keep your gaze (drishti) straight down along your nose.
  • Smile!

I'd love to hear if anyone has tips or stories to share about this pose. :)

Thursday, June 14, 2012

Things I love Thursdays: Lunges


I love lunges. Until recently, I was mostly practicing the Ashtanga primary series in my home practice, which doesn't include any lunges.  I know, I hear you gasp: "no lunges!" Crazy, right?

Because I think that lunges are some of the most wonderful stretches around, and here are a few reasons why:

  • Lunges stretch the Psoas muscle, which is one of the most critical muscles used in walking, standing, sitting, and generally holding your spine in place. Which is pretty important, you know?! A shortened psoas can lead to all kinds of trouble, including long-term postural habits that can cause chronic back pain. Ouch. Stretch with a nice deep low lunge where one hip is trailing slightly.
  • Lunges also stretch the rectus femoris muscle, or hip-flexor, one of the quads that attaches to the hip bone and runs all the way down to attach below the knee, also important for walking,  running, and the relationship between the hip and knee. Stretch in a low or high lunge with the hips square, or go deeper by bending the back knee from a low lunge to catch the foot. Bliss.
So, here's to lunges. Stick them in your sun salutations! Use them as a base to twist or backbend! Dig deep and hold them for minutes on end (and notice when you come out how one leg actually feels a bit longer than the other - that's the psoas and hip flexor letting go a bit!). Enjoy!

Readers, do you love lunges?

(Cover photo: YogaJournal.com)