I used to struggle with this (and most other, let's be honest!) aspect of bakasana, or crow pose (also known as crane pose, kakasana), too. That, and the fear of falling flat on my face... Then one day about a year ago, I took an Anusara workshop with the fabulous Desiree Rumbaugh and her partner Andrew Riven, and their way of teaching this pose made it all come together for me. So, I thought I'd share it here!
The key difference is the starting position. Most of us learning bakasana are told to put our knees up against the backs of our arms, like this:

Desiree and Andrew teach it a bit differently. First, they had us squat down with our feet touching and our hands shoulder width apart, like this:
We stayed here for a few breaths, focusing on hugging the knees against the back and outside of the upper arms and engaging the core to squeeze the knees in.
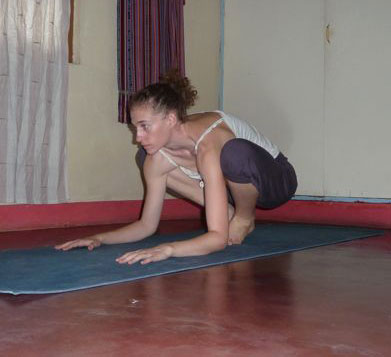
Then, we straightened the arms and walked the hands and feet closer together, still squeezing in, and finally coming up on tiptoes to come to a position like this:

From there, we kept pressing the knees firmly against the upper arms and practiced elevating one foot at a time, keeping the other safely on the ground:

And finally, we gently transferred more weight onto our hands and used our core muscles to lift the feet up!

For me, this method has two serious advantages.
1) There is much less knee slippage - hugging the knees in keeps the knees really nice and stable.
2) The preparatory position is almost exactly the same as the final position! Notice that the feet are together, and the back is rounded like child's pose, just like in the final expression of crow. So all you have to focus on is lifting your feet.
The one disadvantage is that if you are not very open in the hips, the prepatory position can be a bit tricky. To help with this, they suggested using a block or blanket under your feet, to elevate the feet a bit and reduce the load on your hips, like this: (a nice fat pillow in front of you also doesn't go amiss...).

Here's a shot where you can see how the two knee positions compare. It's a subtle change in position but for me, it made a WORLD of difference.

Finally, remember that to come into bakasana from this position, you are not moving forward and down, as it might feel. Your body is staying in almost the exact same place but your feet are lifting up. So the gaze, or drishti in this pose is NOT the floor where you are afraid you are going to face-plant, but forward and upward as you hug your feet - one at a time, or both - up towards the mid-line.
Was this helpful to you? It sure was to me. :) Have you ever had a "revelation" in a pose or a teacher that suddenly opened it up for you? I'd love to hear about it!

Bree, this is a fabulous post! You should put together a book of yoga poses and tips, you're so good at writing clear and concise instructions :). The accompanying photos are wonderful as well and really help me visualize what I need to do.
ReplyDeleteThis does indeed look much more stable, which is wonderful! I could get up into Crow, but I'd always slip off. I'm excited (and a little scared) to try this one. I don't know where else I would have learned about this, so I'm very grateful you wrote about it.
My only question is whether you need a lot of thigh muscle to push up against the arms like this or whether the core does most of the work? Did this take you a while to get down, or did it come pretty naturally?
I'll let you know how it goes when I try it out!
great post! this is how I come into crow, too.
ReplyDeletei also learned with a folded up blanket on the floor in front of me. it helped with the psychology of it - at least if I fell out of the pose I'd like fall face forward onto the soft blanket!
Okay, so awesome, I tried it this morning and was able to hold it a few seconds longer than I typically do the other way! I am so excited!
ReplyDeleteJust came off a high from a Desiree Rumbaugh workshop this past weekend. I too loved her crow approach, but when I came home and began making notes some of the ideas she shared were already forgotten. Thanks for the refresher, and being a visual learner I love your photos!
ReplyDelete@Juliana - hooray!! Well done! I noticed the difference straight away when I learned this trick. :)
ReplyDelete@Jamie - A big fat pillow helps too! ;)
@Nan - when I did her workshop there were lots of people taking notes... Afterwards I wish I had too! But then I probably wouldn't have enjoyed it that much. She is super fun isn't she?
ReplyDeleteGreat post! Love the pictures! I teach both ways in my classes. Mainly to give options because I can't really do it either way! :D
ReplyDeleteGreat post!
ReplyDeleteAnd I agree with the others: you write wonderful instructions and the photos rock.
I love that you can fly now...
This is very helpful, Bree! I've never seen it taught this way. In fact, I don't think I've ever seen it taught at all and I will use this approach with my students. Hope you are well!
ReplyDeletemy students always enjoy falling over in crow, but ill use this approach and see if they can also enjoy actually staying up :)
ReplyDelete@Babs - it took me years to stay up for more than a millisecond! But my partner got it 3rd try. Go figure!! I am happy if my students just try it! Many of them just sit there looking at me as if I were crazy - and some of them even just sit down. Like, what's the harm in trying??
ReplyDelete@Nadine - Thanks! Flying is amazing, especially since I had to overcome so much fear to get there. :)
@Heather - I hope it goes well! Let me know! I like to put it after Malasana so they are already in a nice deep squat.
@Emma - well, sometimes the fun is found in funny places... :)
These tips are great for both teaching and practicing :)
ReplyDeleteI cannot WAIT to a) try this myself (when it's not past my bedtime!), and b) teach this method to my beginners. I have several people who struggle with this pose like I do, and I can't wait to offer them something new. Thanks so much - this is awessome.
ReplyDeleteThis is one pose that I cannot get. I am definitely going to try these tips when I get home! Thanks!
ReplyDeleteThank you! I just tried it, following your instructions, and was able to get my feet off the ground for the very first time. This pose had always been a complete mystery to me. I look forward to practicing it.
ReplyDelete